Admin
Маришка

 Дата регистрации : 2011-02-13 Дата регистрации : 2011-02-13
Возраст : 51
 | |  Носки - но на иностранном.... Носки - но на иностранном.... | |

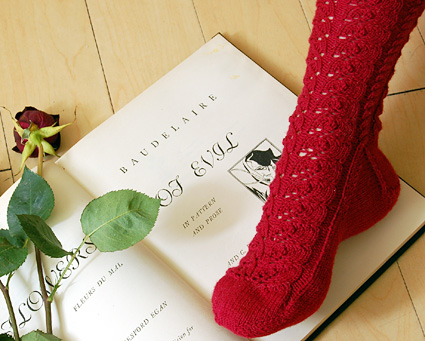  by by
Cookie A.
Try something a little different
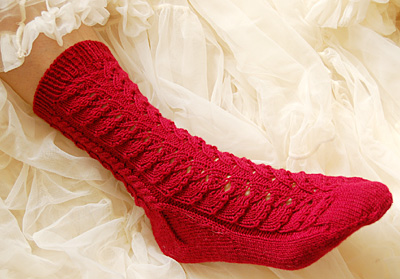
with these lacy toe-up socks. A simple 8 row
repeat leaf lace pattern paired with some cables,
gusset increases, short rowed round heel, and
genuine heel flap -- enough to keep you entertained
without driving you batty. Unless you've done
it all before, you're likely to learn something
new too. Who knew a toe-up sock could be so
well fitted and sexy to boot? Flaunt your mad
knitting skills! |
model & photos:
Cookie A. | | | | S[M, L] (shown
in size S) | Foot circumference:
7.5 [8.0, 8.5] inches
Leg circumference: 7.5/8.5 [8.0/9.0, 8.5/9.5]
inches
In the Leg circumference measurements given
above, the larger of each pair of numbers is
for that size of sock worked with the adaptations
for a larger instep.
Sizing notes:
Even though this is a lace stitch pattern, the
increases and decreases cause some biasing which
results in a less elastic fabric. A larger leg
circumference may be necessary for a large instep,
so alternate leg directions are provided for
larger insteps. If you are uncertain as to whether
or not this is necessary, try the sock on as
you go. For reference, I have size US 6.5EEE
foot with very high instep, and I can just barely
get the unmodified size S over my instep with
a bit of tugging. The area that has to be adjusted
to allow more ease is not the gusset but rather
the leg circumference. | 
Filatura di Crosa Zarina [color=black]ne merino;
181yd/165m per 50g skein];
color: #1493 Crimson; 2 skeins

1 set US #2/2.5mm double-point needles OR circular
needle(s)

2 stitch markers, safety pins or split ring
markers

Stitch holder

Cable needle

Tapestry needle
| | | 32 sts/48 rows
= 4 inches in stockinette stitch |
[Knitty's
list of standard abbreviations and techniques
can be found | This sock is
knit from the toe up using a
8 gusset increases, and a rounded
short row heel with flap.
w&t: Wrap
and turn. Bring yarn to front of work between
needles, slip next st to right-hand needle,
bring yarn around this st to back of work, slip
st back to left-hand needle, turn work to begin
working back in the other direction.
Sssk: Slip next
3 sts knitwise, one at a time, to right needle,
insert left needle back into front of these
3 sts, knit them together.
Front Cable Increase:
Knit into the fronts of the next 4 sts, without
dropping those stitches from the left needle;
you will have 4 sts on your right needle which
overlap 4 sts on your left needle; knit the
4 sts from your left needle through the back
loops, dropping them from the left needle as
usual. You will have increased 4 stitches, with
the new stitches forming a cable twist (to the
right) over the old stitches.
Back Cable Increase:
Knit into the back loops of the next 4 stitches,
without dropping those stitches from the left
needle; you will have 4 sts on your left needle
which overlap 4 sts on your right needle; knit
the 4 sts from your left needle through the
front loops, dropping them from the left needle
as usual. You will have increased 4 stitches,
with the old stitches forming a cable twist
(to the left) over the new stitches.
C4B: Slip next
2 sts to cable needle, hold to back of work,
k2 from left needle, k2 from cable needle.
C4F: Slip next
2 sts to cable needle, hold to front of work,
k2 from left needle, k2 from cable needle.
C8B: Slip next
4 sts to cable needle, hold to back of work,
k4 from left needle, k4 from cable needle.
C8F: Slip next
4 sts to cable needle, hold to front of work,
k4 from left needle, k4 from cable needle.
Sewn Bind Off
Break yarn, leaving a tail at least 3 times
longer than the edge you are binding off. Thread
yarn tail on a tapestry needle, and work as
follows:
*Draw tapestry needle through first 2 sts
on knitting needle purlwise, bring tapestry
needle around front of second st on knitting
needle and draw back through first st knitwise,
drop first st from knitting needle. Repeat from
* until all sts are bound off.
Excellent photos of this process can be found
|
  Toe Toe
Using the Figure 8 Cast On method, CO 16 sts
(8 sts on each of 2 needles). Two stitch markers
will be used to divide the top and the bottom
of the toe and foot of the sock.
Arrange the sts on the needle(s) as desired
while working the first round. If you have
the stitches arranged on your needles in such
a way that the marker placement falls between
the needles, place safety pins or split ring
markers in your work instead, and move these
markers up as your work progresses.
Round 1: [K1, m1, k6, m1, k1, place
marker] twice. 20 sts.
Round 2: K all sts
Round 3: [K1, m1, k to 1 stitch before
marker, m1, k1] twice. 4 sts increased.
Round 4: K all sts.
Repeat these 2 rounds 9[10, 11] times more.
60[64, 68] sts.
Foot
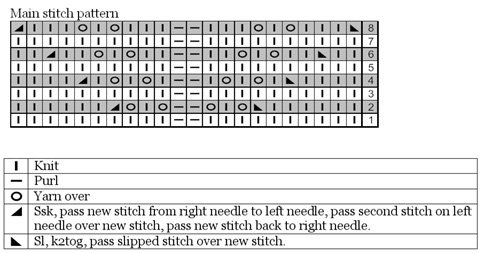
Set-up Round: K2, p0[1, 1], k0[0,
1], p2, work first row chart pattern, p2,
k0[0, 1], p0[1, 1], k2; k to end of round.
The first 30[32, 34] sts of the round form
the top of the foot, the remaining 30[32,
34] sts form the sole. The stitch markers
divide these 2 sets of sts.
Next Round: K2, p0[1, 1], k0[0,
1], p2, work next row chart pattern, p2, k0[0,
1], p0[1, 1], k2; k to end of round.
Repeat this round until work measures 3.5[3.5,
4] inches less than length of foot.
Gusset
Round 1: Work in pattern as set.
Round 2: Work in patt to marker,
slip marker, m1, k to marker, m1. 2 sts increased.
Repeat these 2 rounds 11 times more. 84[88,
92] sts.
Work in patt to first marker, place these
30[32, 34] sts on hold on needle or stitch
holder. Heel will be worked back and forth
over remaining 54[56, 58] sts. Make note of
last row of chart pattern; first round of
Leg will begin on following row of chart pattern.
 Heel Heel
Row 1 [RS]: K41[43, 45], w&t.
Row 2 [WS]: P28[30, 32], w&t.
Row 3 [RS]: K27[29, 31], w&t.
Row 4 [WS]: P26[28, 30], w&t.
Row 5 [RS]: K25[27, 29], w&t.
Row 6 [WS]: P24[26, 28], w&t.
Row 7 [RS]: K23[25, 27], w&t.
Row 8 [WS]: P22[24, 26], w&t.
Row 9 [RS]: K21[23, 25], w&t.
Row 10 [WS]: P20[22, 24], w&t.
Row 11 [RS]: K19[21, 23], w&t.
Row 12 [WS]: P18[20, 22], w&t.
Row 13 [RS]: K17[19, 21], w&t.
Row 14 [WS]: P16[18, 20], w&t.
Row 15 [RS]: K15[17, 19], w&t.
Row 16 [WS]: P14[16, 18], w&t.
Row 17 [RS]: K13[15, 17], w&t.
Row 18 [WS]: P12[14, 16], w&t.
Row 19 [RS]: K11[13, 15], w&t.
Size L Only:
Row 20 [WS]: P14, w&t.
Row 21 [RS]: K13, w&t.
Row 22 [WS]: P12, w&t.
Row 23 [RS]: K11, w&t.
All Sizes:
Next Row [WS]: P11[13, 11]; p next
8[8, 10] sts, picking up each wrap (loop of
yarn wrapped around base of st) and purling
it together with the st it had wrapped; pick
up next wrap and place on left needle, p3tog
(wrap on left needle, st which it had wrapped,
and next st, all purled together). Turn work
(do not wrap st).
Next Row [RS]: Sl 1, k19[21, 21];
k next 9[9, 11] sts, picking up each wrap
and knitting it together with the st it had
wrapped; pick up next wrap and place on left
needle, sssk (wrap, st which it had wrapped,
and next st, all worked together.) Turn work
(do not wrap st).
Next Row [WS]: Sl 1, p28[30, 32],
p2tog. Turn work.
Next Row [RS]: Sl 1, k28[30, 32], ssk.
Turn work.
Repeat these 2 rows 10 times more; all sts
have been worked. 30[32, 34] sts remain on
this needle.
Leg
Note: If making sock for foot with larger
instep, proceed to "Leg Instructions
for Larger Instep" below.
If sts for top of foot have been placed
on stitch holder, replace them now on needle(s).
Leg will be worked in the round over all 60[64,
68] sts. When working next round (Set-up Round),
beginning of round will be shifted 2 sts to
the left. Place marker as instructed; remove
any other markers currently in place.
Set-up Round: K2, place marker
(this will be new beginning of round); [p0[1,
1], k0[0, 1], p2, work next row of chart pattern,
p2, k0[0, 1], p0[1, 1], k4] twice.
Round 1: P0[1, 1], k0[0, 1], p2,
work next row of chart pattern, p2, k0[0,
1], p0[1, 1], C4B, p0[1, 1], k0[0, 1], p2,
work next row of chart pattern, p2, k0[0,
1], p0[1, 1], C4F.
Rounds 2-4: [P0[1, 1], k0[0, 1], p2,
work next row of chart pattern, p2, k0[0,
1], p0[1, 1], k4] twice.
Repeat Rounds 1-4, 13 times more,
or until work is 1 inch shorter than desired
length.
Proceed to Ribbing.
Leg Instructions for Larger Instep:
If sts for top of foot have been placed on
stitch holder, replace them now on needle(s).
Leg will be worked in the round over all 60[64,
68] sts. When working next round (Set-up Round
1), beginning of round will be shifted 2 sts
to the left. Place marker as instructed; remove
any other markers currently in place.
Set-up Round 1: K2, place marker
(this will be new beginning of round); [p0[1,
1], k0[0, 1], p2, work next row of chart pattern,
p2, k0[0, 1], p0[1, 1], k4] twice.
Set-up Round 2: P0[1, 1], k0[0,
1], p2, work next row of chart pattern, p2,
k0[0, 1], p0[1, 1], work Front Cable Increase,
p0[1, 1], k0[0, 1], p2, work next row of chart
pattern, p2, k0[0, 1], p0[1, 1], work Back
Cable Increase. 68[72, 76] sts.
Rounds 1-7: [P0[1, 1], k0[0, 1],
p2, work next row of chart pattern, p2, k0[0,
1], p0[1, 1], k8] twice.
Round 8: P0[1, 1], k0[0, 1], p2, work
next row of chart pattern, p2, k0[0, 1], p0[1,
1], C8B, p0[1, 1], k0[0, 1], p2, work next
row of chart pattern, p2, k0[0, 1], p0[1,
1], C8F.
Repeat Rounds 1-8 6 times more, or
until work is 1 inch less than desired length.
Proceed to Ribbing.
  by by
Cookie A.

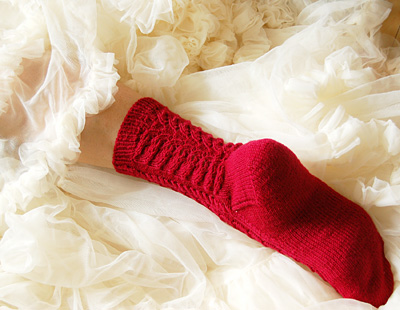
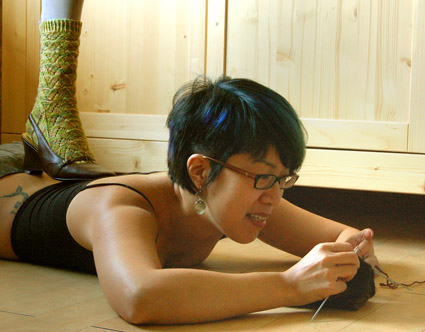
I would like to say that I
knit these socks because I was inspired by falling
leaves, the angles of tree branches as they
part from mighty oaks in a V-shape, or allude
to poetry and art. But let's face it: the true
driving force behind these socks was ADDICTION.
There was no other way to get them off my back
than to knit them.
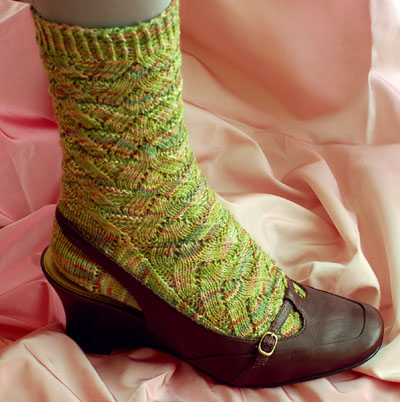
It was all very simple. I
waded through my stash. I started with yarn,
hand dyed in Canada, the birth place of many
great yarns. I thought about shapes and angles
that would work well with the variegated colors,
and voila! The next thing I knew, after weeks
of ripping and reknitting and ripping and reknitting
(no less than four times, just ask my knitting
group), I had a sock.
|

model: Cookie
A. 
photos: John
H., Cookie A. |
|
| | Women's medium | Circumference:
8 inches, unstretched
Foot length: You decide!
| 
Shelridge Farm Soft Touch Ultra Fingering Weight
[100% superwash merino; 194yd/177m per 50g skein]; color: handpainted; 2
skeins 
Set of 5 US #2/2.5mm double-point needles

Split ring marker or safety pin (optional)

Tapestry needle
|
| 32 sts/48 rows
= 4 inches in stockinette stitch and Lace Pattern | |
[Knitty's
list of standard abbreviations and techniques
can be found | Yo2:
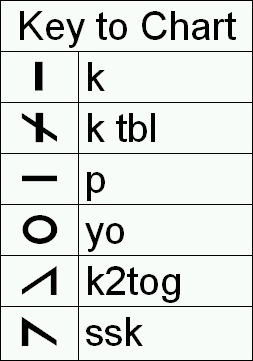
Yarn over twice.   Lace Lace
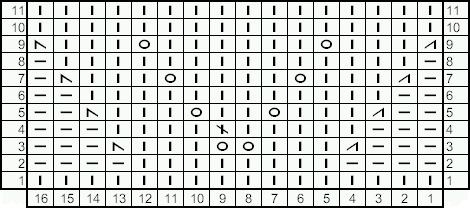
Pattern (Worked in the round over a multiple
of 16 sts): Round 1:
K all sts.
Round 2: [P4, k8, p4] to end.
Round 3: [P3, k2tog, k3, yo2, k3,
ssk, p3] to end.
Round 4: [P3, k5, k1 tbl, k4, p3]
to end.
Round 5: [P2, k2tog, k3, yo, k2,
yo, k3, ssk, p2] to end.
Round 6: [P2, k12, p2] to end.
Round 7: [P1, k2tog, k3, yo, k4,
yo, k3, ssk, p1] to end.
Round 8: [P1, k14, p1] to end.
Round 9: [K2tog, k3, yo, k6, yo,
k3, ssk] to end.
Round 10: K all sts.
Round 11: K all sts.
Repeat Rounds 1-11 for Lace Pattern.
Twisted Rib (Worked
in the round over an even number of sts):
Round 1: [K1 tbl, p1] to end of rnd.
Every round is the same.
Blocking
Information about blocking can be found
Grafting
Instructions for grafting can be found
|   Cuff Cuff
CO
64 sts. Divide evenly between needles (16
sts on each needle) and join to begin working
in the round, being careful not to twist.
After a few rounds have been worked, you may
wish to place a split ring marker or safety
pin in work to indicate beginning of round.
Work in Twisted Rib until work measures
1 inch.
Leg
Work Rounds 1-11 of Lace Pattern 6 times.
Heel Flap
First Set-up Row: K16; turn work
so that WS is facing.
Second Set-up Row: [Sl 1, p31]
onto 1 needle. Heel flap will be worked back
and forth on these 32 sts; remaining 32 sts
on hold for instep.
Row 1 [RS]: Sl 1, k31.
Row 2 [WS]: Sl 1, p31.
Repeat these 2 rows 14 times more. There will
be 15 slipped sts along each side edge of
the heel flap.
Note: If you have a large instep, you
may wish to work a longer heel flap, to add
height to the foot of the sock. If you do
this, be sure to work more gusset decrease
rounds accordingly.
Turn Heel
Row 1
[RS]: K17, ssk, k1, turn work.
Row 2 [WS]: Sl1, p3, p2tog, p1, turn
work.
Row 3 [RS]: Sl1, k4, ssk, k1, turn
work.
Row 4 [WS]: Sl1, p5, p2tog, p1, turn
work.
Row 5 [RS]: Sl1, k6, ssk, k1, turn
work.
Row 6 [WS]: Sl1, p7, p2tog, p1, turn
work.
Row 7 [RS]: Sl1, k8, ssk, k1, turn
work.
Row 8 [WS]: Sl1, p9, p2tog, p1, turn
work.
Row 9 [RS]: Sl1, k10, ssk, k1, turn
work.
Row 10 [WS]: Sl1, p11, p2tog, p1,
turn work.
Row 11 [RS]: Sl1, k12, ssk, k1, turn
work.
Row 12 [WS]: Sl1, p13, p2tog, p1,
turn work.
Row 13 [RS]: Sl1, k14, ssk, k1, turn
work.
Row 14 [WS]: Sl1, p15, p2tog, p1,
turn work. 18 sts remain.
Row 15 [RS]: K9. Proceed to gusset.
  Gusset Gusset
Working yarn is currently
located at center of heel; this point wll
be beginning of round for gusset, foot and
toe. When working Round 1 of gusset, needles
will be designated Needle 1, Needle 2, etc.
They will retain these designation throughout
rest of sock.
Round 1: Using Needle 1, k remaining
9 sts of heel flap, pick up and k 15 sts along
side edge of heel flap (1 st in each slipped
st) and 1 st between top of heel flap and
held instep sts; using Needles 2 and 3, k
32 instep sts (Row 1 of Lace Pattern); using
Needle 4, pick up and k 1 st between instep
sts and top of heel flap, pick up and k 15
sts along side edge of heel flap, k remaining
9 sts of heel flap. 82 sts: 25 sts each on
Needles 1 and 4, 16 sts each on Needles 2
and 3.
Round 2: K9, k14 tbl, k2tog; work
Round 2 of Lace Pattern over sts on Needles
2 and 3; ssk, k14 tbl, k9.
Round 3: K to end of Needle 1;
work next round of Lace pattern over sts on
Needles 2 and 3; k to end of Needle 4.
Round 4: K to last 2 sts of Needle
1, k2tog; work next round of Lace pattern
over sts on Needles 2 and 3; ssk, k to end
of Needle 4.
Repeat Rounds 3 and 4 seven times
more. 64 sts; 16 sts on each needle.
Foot
Continue in pattern as set, working sts on
Needles 1 and 4 in stockinette st and sts
on Needles 2 and 3 in Lace Pattern, until
work measures approx. 1.5 inches less than
desired length, ending with Row 1, 10, or
11 of Lace Pattern.
Toe
K 1 round.
Decrease Round: K to last 3 sts on Needle
1, k2tog, k1; k1, ssk, k to end of Needle
2; k to last 3 sts on Needle 3, k2tog, k1;
k1, ssk, k to end of Needle 4.
Repeat these 2 rounds 8 times more. 28 sts
remain.
Using Needle 4, k to end of Needle 1.
Slip sts from Needle 2 to Needle 3.
Graft sts on Needle 3 to sts on Needle 4. |
|
| |
|

 Пт Сен 14, 2018 9:00 pm автор Admin

 by
by 

 Heel
Heel
 by
by 


